
Search Tutorial
Try searching: "inventory", "sales", "customer", "reports"
Welcome to Your POS Journey
We're excited to help you transform your business with MoneyCache POS. This interactive tutorial will guide you through every feature, step by step.
10 Comprehensive Steps
From basics to advanced features
Video Tutorials
Visual guides for every step
Searchable Content
Find what you need instantly
What Is a POS System and Why You Need One
Understand the basics of a POS system, how it works, and why it's essential for modern businesses of all sizes.
MoneyCache POS is designed to simplify your business operations by automating sales tracking, inventory management, and customer records. Follow these steps to understand how it works:
1. Record a Sale Instantly
- Go to the Sales section.
- Select the product purchased by the customer.
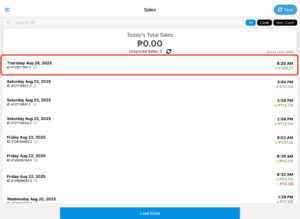
The system will:
- Deduct the item from your stock count.
- Add the transaction to your daily sales report.
2. Monitor Inventory in Real-Time
- Open the Product tab and select Branch List.

(BACK OFFICE)
- Watch as stock levels automatically decrease with each sale.
- If an item is low in stock, a notification will appear.
3. Manage Customer Details at Checkout
- During checkout, tap Add Customer.
- Enter the customer's name and contact details.

- This information will be stored in your Customer Management System for future reference.

(BACK OFFICE)
4. Generate Business Reports
- Go to the Reports section.

(BACK OFFICE)
- Choose between daily, weekly, or monthly summaries.

(BACK OFFICE)
- Reports automatically update with every sale.
5. Access Your Business Anywhere
- Log in using your MoneyCache account on your phone or computer.
- View sales, inventory, and reports even if you're away from your store.
6. Review Key Benefits
- Real-time sales tracking
- Automatic inventory management
- Customer data storage
- Easy-to-read reports
- Remote access from any device
Confirm You're Ready to Use MoneyCache POS
After familiarizing yourself with sales, inventory, and reporting features, you are now ready to manage your business more efficiently.
Say goodbye to manual errors and hello to confidence with MoneyCache POS.
Getting Started — How Easy It Is to Set Up
Learn how quick and simple it is to set up your POS, from installation to initial configuration, in just a few minutes.
Setting up MoneyCache POS is quick and simple. Even if you're not tech-savvy, you can get your system running in just a few steps. Follow this guide to start using MoneyCache POS:
1. Unbox Your POS Hardware (Optional)
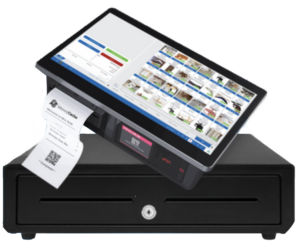
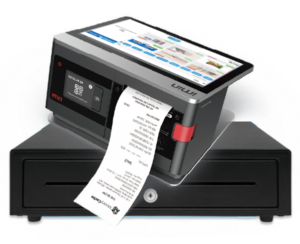
- If you purchased a hardware package, you will receive a tablet, receipt printer, and barcode scanner.
- Remove the items from the box.
- Connect each device to a power source.
- Ensure all devices are turned on.
Note: If you are using your own device (tablet, laptop, or desktop), skip to Step 2.
2. Power On and Connect Your Device
- Turn on your tablet, laptop, or desktop computer.
- Make sure you are connected to the internet (WiFi or LAN).
3. Log In to Your MoneyCache POS Account
- Open the MoneyCache POS application or website.
- Enter your registered email/username and password.
- Click Log In to access your account.
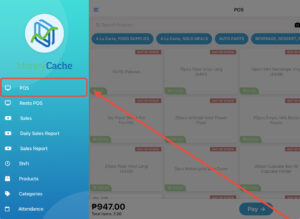
4. Explore the Dashboard
After logging in, you will be redirected to the MoneyCache POS Dashboard, where you will see:

- Dashboard – access the main control panel with system shortcuts.
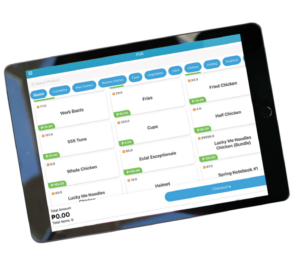
- Sell – process customer transactions and manage POS functions.
- Restaurant POS / Reception POS – dedicated interfaces for food service and front desk operations.
- Ice Production Monitoring Sheet – track ice production activities.
- Cash Register – handle cash in/out operations.
- Kitchen Queue – monitor and fulfill kitchen orders.
- Reservation – manage customer bookings.
- Product – manage your items, categories, add-ons, and pricing.
- Actual Vs Stock – check and reconcile system stock against actual stock count.
- People – manage suppliers, customers, employees, and agents.
- Stock Control – oversee purchases and stock ordering.
- Expense – record and categorize business expenses.
- Calendar – view and manage schedules or business events.
- Return to Supplier – record and track returned goods to suppliers.
- Report – generate summaries and analytics for performance review.
- Branch – view branch details, settings, transfers, and comparisons.
- Advanced – configure advanced system settings and user roles.
- Billing – review and manage billing information.
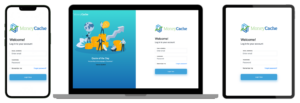
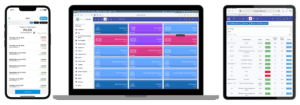
5. Try It on Any Device
MoneyCache POS works across multiple platforms:
- Desktop or Laptop (via browser)
- Tablet (iOS or Android)
- Mobile Phone (mobile-friendly dashboard)
- Simply log in with your account credentials and access the same real-time data.
6. Start Selling in Minutes
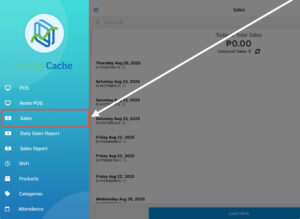
Once logged in, go to the Sales tab.
- Select an item from your inventory.
- Complete your first sale to see your POS system in action.
7. Stay Connected Anywhere
- Check your sales and inventory even when you are away from the store.
- Access reports from your phone or computer while on vacation, at meetings, or at home.
You have successfully set up MoneyCache POS!
Your POS system is now ready to help you track sales, manage inventory, and grow your business—all in just a few minutes.
How to Transact a Sale
Practice completing sales transactions efficiently and professionally, ensuring smooth operations at your counter.
Processing sales with MoneyCache POS is quick and professional. This guide will walk you through completing a transaction—from adding items to finalizing payment.
1. Add Items to the Cart
- Go to the POS section.
Add products in any of the following ways:
- Click product photo directly on the dashboard.
- Scan the barcode using a barcode scanner.
- Search by product name or barcode number.
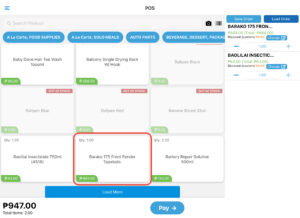
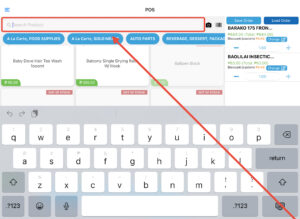
The selected items will automatically appear in the customer's cart.
2. Apply Discounts or Promos (Optional)
- Tap the Discount/Promo option.
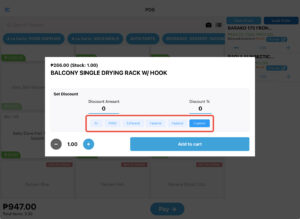
Choose from:
- Fixed amount discount
- Percentage discount
- Senior Citizen or PWD discount (auto-applied if selected)
- Confirm the discount before proceeding to checkout.
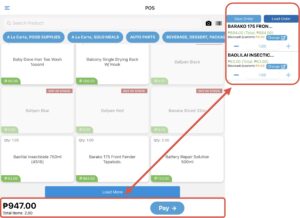
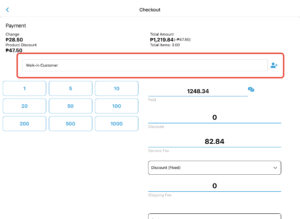
3. Proceed to Checkout
- Tap Checkout to move to the payment screen.
At checkout, you may:
- Enter a new customer's details to save them in the system.
- Leave the field blank for walk-in customers.
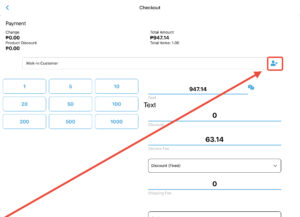
4. Select a Payment Method
MoneyCache POS supports multiple payment options:
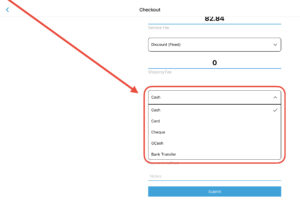
- Cash
- Debit/Credit Card
- GCash / Maya
- Bank transfer
- Split payment (if customer uses two methods)
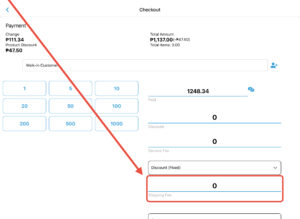
Additional Options:
- Add a service charge (for restaurants).
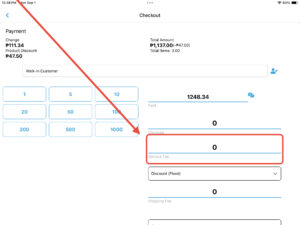
- Add a shipping/delivery fee if required.
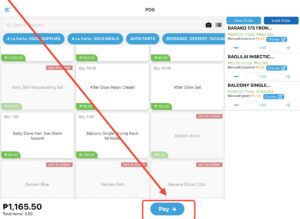
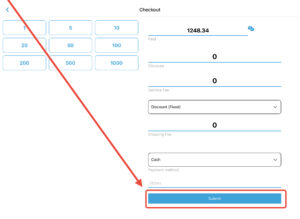
5. Finalize the Sale
- Review the total amount, payment received, and change (if applicable).
- Tap SUBMIT to complete the transaction.
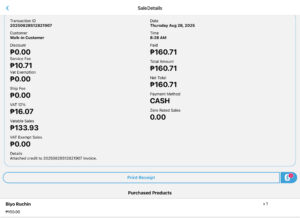
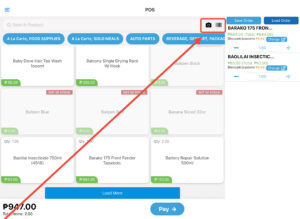
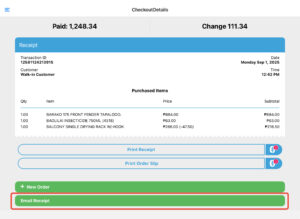
6. Print or Send a Receipt
- Choose Print Receipt if connected to a receipt printer.
- Or tap Send via Email to provide a digital copy to the customer.

7. Confirm Transaction Completion
Once payment is processed:
- The system records the sale instantly.
- Inventory is updated in real-time.
- Reports are automatically updated.
You have successfully completed a sale using MoneyCache POS.
Every transaction is smooth, fast, and accurate—making it easier for your staff and ensuring a better experience for your customers.
How to Manage Inventory
Discover how to add new products, update stock levels, track stock-in/stock-out, and receive low-stock or expiry alerts in real time.
Managing your inventory with MoneyCache POS is simple and automated. Instead of dealing with manual stock counts and messy ledgers, everything is tracked in real time. Follow these steps to keep your products organized and error-free.
1. Add a New Product
- On the POS Dashboard, go to Products
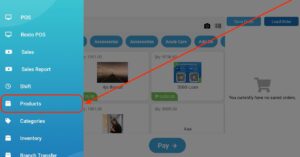
- Click Add New Product.
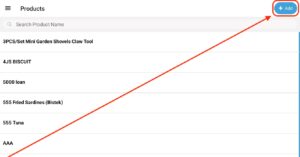
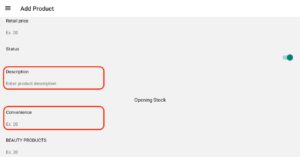
Enter the required details:
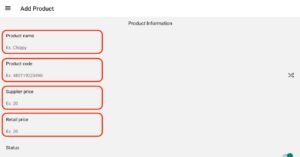
- Product Name
- Product Code
- Supplier Price
- Retail Price
- Description
- Opening Stock Quantity
- Category (e.g., Grocery, Beverage, Pharmacy, etc.)
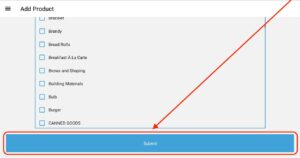
Optional:
- Scan the barcode if the product has one.
- Generate a barcode automatically if no barcode exists.
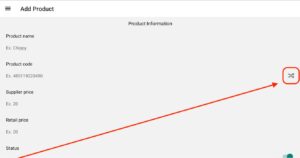
- Click Submit to add it to your catalog.
2. Manage Stock Movements (Stock-In / Stock-Out)
Stock-In (Restocking):
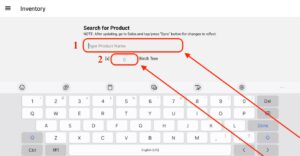
- Go to Inventory
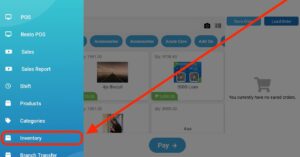
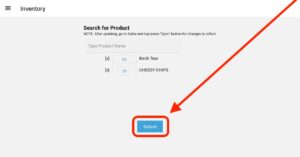
- Select the product and enter the quantity received.
- Click Confirm. Your stock levels will update instantly.
Stock-Out (Adjustments or Reports):
- Go to Back Office (https://money-cache.com/login)
- Click Products then Branch List

- Choose the product that you want to stock-out/pull-out
- Click Actions then Pull-out

- Enter the quantity to be removed.

- Click Pull out. This is useful for damaged items, supplier returns, or tracking samples.
3. Automatic Inventory Updates from Sales
- Every time you complete a sale, product quantities are automatically deducted.
- No manual counting or adjustments needed.
4. Low Stock Alerts
- MoneyCache POS sends a Low Stock Alert when items are running out.
- The alert appears directly on your dashboard.
- This ensures you never miss a replenishment and avoid lost sales.
5. Expiry and Slow-Moving Product Monitoring
- Products nearing expiry are flagged in your inventory list.


- Slow-moving items are highlighted so you can take action.

6. Real-Time Visibility Anywhere
Check your stock status anytime on your:
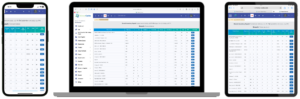
- Desktop
- Tablet
- Mobile Phone
This ensures you're always in control, whether in-store or away.
7. Smarter Inventory Decisions
Use the Inventory Reports to:
- See what's selling fast.
- Avoid overstocking items that don't move.
- Identify products you need to restock immediately.
You have successfully managed your inventory with MoneyCache POS.
From adding products to restocking, tracking expiry, and monitoring sales performance—everything is simplified and automated, giving you control and peace of mind.
How to Generate Business Reports
Gain insights into your business with daily, weekly, or monthly sales, top-selling items, employee performance, and growth trends.
MoneyCache POS gives you complete visibility of your business performance. From inventory to sales, profit, and even customer insights—everything is tracked and summarized into easy-to-understand reports, so you can make smarter business decisions anytime, anywhere.
1. Open the Reports Tab
- On your POS Dashboard, click Reports.

(Back Office)
You'll see a list of all available reports, organized in one place.
2. Choose the Type of Report You Need
Here are the most common reports you can view:

- Inventory Report – Track current stock levels and item status.
- Purchase Report – Review supplier purchases and stock-ins.
- Sales Report – See individual sales transactions.
- Sale Summary Report – Get a summarized view of sales by date range.
- Profit Report & Profit Summary – Instantly calculate profit margins.
- Credit Report – Track customer credit and payments.
- Expense Report – Record and monitor operating expenses.
- Expiring Products Report – Get alerts on soon-to-expire items.
- Hot Products Report – Know your best-sellers.
- Least Selling Products Report – Identify items that need promos or discounts.
- Hourly Sales & Transactions Report – Spot your busiest times of the day.
- Item Summary Report – Detailed breakdown of product performance.
- Referral Report – Track sales generated via referrals.
- Payment Method Report – See which payment channels customers use most.
3. Filter by Date Range
- Use the calendar filter to view reports by daily, weekly, or monthly periods.

This makes it easy to compare performance over time.
4. Review & Analyze Data
- Quickly spot your top-selling products and slow movers.


Hot Products Report Least Selling Products Report
- Monitor employee productivity or compare branch performance.


- Study sales and profit trends using summary and comparison graphs.


5. Access Reports Anytime, Anywhere
- Since MoneyCache is cloud-based, you can log in from your mobile phone, tablet, or desktop.
Stay updated even when you're away from the store.
6. Export or Share Reports
- Reports are presented in a clean, easy-to-read format.

- You can Print, Print Summary, Export Excel, and Export Peachtree
Export them instantly for record-keeping, accounting, or team reviews.
You've successfully generated a report with MoneyCache POS.
With comprehensive reporting tools at your fingertips, you can track every aspect of your business performance and make data-driven decisions that drive growth.
How to Manage Customers and Build Loyalty
Easily save customer details, view purchase history, and create loyalty programs that reward repeat buyers and boost long-term growth.
MoneyCache POS helps you build lasting customer relationships. By recording customer details and tracking their purchases, you can create loyalty programs that reward repeat buyers—turning one-time customers into loyal supporters of your business.
1. Add Customer Details During Checkout
On the Checkout Page, enter the customer's:
- Name
- Contact number
- Address
For returning customers, simply select their name from the dropdown list.
This ensures every transaction is linked to the right customer profile.
2. Access Customer Purchase History
Once a customer profile is saved, MoneyCache automatically records:

Click Sales Report, select the Customer you want to check, then the Date

- Items frequently purchased
- Frequency of visits
- Total spending
- This helps you understand their buying habits and preferences.
3. Sending Promos to Customers (Manual Process)
- Go to the Back Office (https://money-cache.com/)

- Click on People.
- Select Customers.

- Use the Export option to download customer details.

- Open the exported file to get contact information such as phone numbers or emails.

- Create your promo message.
- Send the message to customers using your preferred platform (SMS, email, or messaging app).
4. Set Up a Loyalty Program
- Reward your customers with points for every purchase.
- Points can be redeemed for discounts, freebies, or perks.
- This encourages repeat visits and increases customer satisfaction.
5. Monitor Customer Engagement
View reports to see:
- Which customers buy most often
- Who your high-value customers are
- Repeat purchase patterns
This helps you identify and nurture your most loyal buyers.
6. Encourage Repeat Purchases
Customers who receive rewards or promos are more likely to return. Loyalty tools help you increase sales while strengthening relationships.
You've successfully managed customer data and set up a loyalty system with MoneyCache POS.
By valuing your customers, you don't just increase sales—you build a community of repeat buyers who also refer friends and family to your business.
How to Login Using Selfie Attendance
Learn how Selfie Attendance ensures secure and accurate time tracking using personal logins and PIN verification.
Selfie Attendance makes time tracking accurate, secure, and easy to manage. By using your personal account and PIN, each clock in and clock out is verified, ensuring that your attendance records are reliable and up to date. Follow these steps to learn how it works:
1. Log In to Your Personal Account
Start by accessing your account using your personal login credentials.

- Make sure you are using your assigned account to ensure correct time tracking.
- This ensures all attendance logs are attributed to the right user.
(Mobile App)
2. Go to the Attendance Section
Navigate to the "Attendance" section on the menu.

- This is where you can clock in/out and view attendance records.
- Ensure you have a stable internet connection before proceeding.
3. Clock In or Clock Out
Tap the red "Clock In" or "Clock Out" button to log your attendance.

- The system will instantly record your time.
- Your log will automatically be reflected in your attendance records.
(Mobile App)
4. View Your Attendance Records
To check your logs:

- Tap the icon in the upper right corner of the screen.
- Select "Attendance" again.

- Your clock in/out records for the week will appear.

(Mobile App – Weekly View)
How to Clock In/Out Using a Different User Account
If multiple employees use the same device, you can easily switch accounts securely.
1. Go to the Attendance Section
From the dashboard, tap "Attendance."
(Shared Device)
2. Switch to Another User
- Tap the icon in the upper right corner.
- Select "Change User."

3. Enter Your PIN
Input your 6-digit PIN to verify your identity.

- This step ensures only authorized users can clock in or out.
(PIN Verification Screen)
4. Confirm Your Name
Check that your name appears on the screen before proceeding.
- This avoids logging attendance under the wrong user.
5. Clock In or Clock Out
Tap the red "Clock In" or "Clock Out" button to record attendance under your account.
- The system will register your time instantly.
- Your attendance will be properly reflected in the reports.
Key Benefits
- Accurate Time Logs – Each entry is tied to personal credentials.
- Secure Access – PIN verification prevents unauthorized use.
- Multiple Users, One Device – Easy switching without logging out.
- Weekly Overview – Quickly review attendance history anytime.
You've successfully learned how to use Selfie Attendance!
With secure PIN verification and personal account tracking, your attendance system is both accurate and reliable.
How to Edit a Product in the POS
Learn how to quickly edit product information, save changes, and ensure data consistency across your system.
Keeping your product details up to date is essential for accurate inventory, pricing, and reporting. With MoneyCache POS, editing a product is fast and straightforward. Follow these steps to update product information efficiently.
1. Select the Product to Edit
Locate the specific product you want to update.
- Click on the Masterlist.
- Choose the product and click the Action Button.
- From the dropdown options, select Edit to open the product editor.
(Back Office)

2. Edit the Product Details
Once the product editor is open, you can modify any of the following fields:

- Product Name
- Price
- Product Code / Barcode
- Stock Quantity
- Supplier Information
- Category
- Product Image (optional upload)
Make sure all information is accurate to avoid discrepancies in inventory or reports.
3. Save Your Changes
After updating the necessary fields:
- Click the Save or Update button.
- This will apply the changes immediately in the system.
(Back Office)
4. Confirm Successful Update
A success notification will appear once the system saves the changes.
- The updated details will now reflect in your Product Masterlist and Inventory Reports.
Key Benefits
- Accurate Inventory Data – Avoid mismatched stock and pricing.
- Quick Edits – Update product details in just a few clicks.
- Centralized Control – All updates are reflected across reports and POS transactions.
- Flexible Fields – Edit prices, categories, or even product images anytime.
You've successfully learned how to edit products!
Keeping your product information up to date ensures smooth operations and accurate business insights.
How to Modify Staff Access in Your POS System
Update employee settings, toggle permissions, and assign branch roles to maintain security and operational efficiency.
Managing staff permissions ensures that each team member has the right level of access based on their role. With MoneyCache POS, you can easily update or change staff access rights in just a few steps.
1. Go to Staff Management
From your dashboard, navigate to People settings, then click on Employees.

- This section displays a list of all staff members registered in your POS system.
- Here, you can view and manage their roles, permissions, and account details.
(Back Office)
2. Select the Staff Member
Find the employee whose access rights you want to update.
- Click on the staff profile.
- Tap the Edit button to open their settings panel.
(Back Office – Employees)
3. Edit Access Rights
Once in the staff editor, configure permissions according to the employee's role.
You can toggle or check permissions for areas such as:

- Sales Only
- Inventory Access
- Reports
- Discount Permissions
- Multi-Branch Access
- Transact Only Mode
Additional actions you can do:
- Assign the employee to a specific branch or store location.
- Update their password or email address if needed.

(Back Office – Staff Settings)
4. Save the Changes
Once you've updated the necessary permissions:
- Click Save or Update to apply the changes.
- A confirmation message will appear to confirm the update.
(Back Office)
Key Benefits
- Role-Based Permissions – Ensure each employee only accesses what they need.
- Improved Security – Prevent unauthorized changes to sensitive areas.
- Centralized Management – Edit staff details and access in one place.
- Branch-Level Control – Assign staff to specific locations when needed.
You've successfully learned how to manage staff access!
With proper permission settings, your team can work efficiently while maintaining security across your POS system.
How to Manage Multi-Branch Operations
Learn how to switch between branches, manage inventory and staff, and get a complete overview of your business performance.
Managing multiple business locations can be complex but with MoneyCache POS, you can oversee all branches in real time, ensuring smooth operations, centralized reporting, and efficient staff management. Follow the steps below to make the most of your multi-branch setup.
1. Access Multi-Branch Settings
From the dashboard, go to Branch Management to view all your business locations in one place.
- Here, you can see the complete list of branches linked to your POS account.
- This is the starting point for switching between branches, checking performance, and managing centralized data.
(Back Office – Branches / Details)
2. Switch Between Branches
Easily navigate between branches using the branch dropdown or branch list.
- Select a specific branch to view its details.
- Monitor real-time sales, inventory levels, staff activities, and product transfers.
- This gives you branch-specific visibility whenever needed.
(Back Office – Branch Selector)
3. Centralized Inventory & Reports
MoneyCache POS consolidates data from all branches into a centralized dashboard.
- View stock reports across all locations to avoid overstocking or understocking.
- Analyze sales performance per branch or overall performance from one place.
- Centralized reporting supports smarter inventory distribution and sales planning.
(Back Office – Reports / Inventory)
4. Staff & Access Control
Assign staff to specific branches and manage their permissions easily.
- Limit access based on branch location to maintain security.
- Ensure each staff member only manages transactions and data relevant to their assigned branch.
- This setup supports clear accountability and smoother operations.
(Back Office – People / Employees)
5. Get an Overall Business View
With just one click, view a dashboard showing your entire business performance.
- Monitor all branch activities from a single control panel.
- Quickly identify trends, issues, and opportunities across locations.
- This centralized view helps you make informed decisions fast.
(Back Office – Multi-Branch Dashboard)
Key Benefits
- Real-Time Branch Switching – Seamlessly view data for each location.
- Centralized Sales & Inventory – Manage resources effectively across all branches.
- Controlled Staff Access – Assign roles per branch for better security.
- Strategic Insights – Get a full business overview to guide decisions.
You've successfully learned how to manage multi-branch operations!
With MoneyCache POS, managing multiple locations is streamlined, giving you complete visibility and control over your entire business.
How to Get Support and Updates
Enjoy reliable local support, automatic software updates, and on-site assistance—ensuring your POS runs smoothly and stays up to date at all times.
With MoneyCache, you're never left alone. Beyond powerful software, you get the backing of a local support team with over 10 years of experience helping businesses thrive.
1. Reach Out Anytime
Need assistance? Contact us by:
- Phone call: 0917-113-0904
- Direct message or email: support@money-cache.org
- MoneyCache Facebook Page: https://www.facebook.com/moneycachepos

Our team responds quickly, professionally, and with a friendly approach.
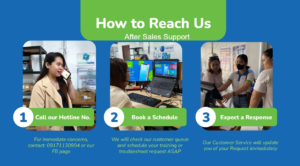
2. Get In-Person Assistance
For technical issues or setup needs, our support staff can:
- Visit your business site
- Provide on-the-spot troubleshooting or installation help
- This ensures you're always backed up—not just virtually, but physically when needed.
3. Benefit from Automatic Updates
MoneyCache POS updates itself automatically:
- No manual downloads required
- No business downtime
- Always running on the latest, most secure version
- While you serve your customers, the system keeps improving in the background.
4. Reliable Hosting and Performance
Powered by trusted global IT hosting services. Ensures your POS is:
- Safe
- Stable
- Always available
5. Local Presence You Can Trust
Our team isn't just virtual. We have offices with real staff ready to:
- Handle walk-ins
- Answer calls and video consultations
- Provide long-term support for your growing business
🎉 Congratulations! You've Completed the Tutorial!
With MoneyCache, support is not an afterthought—it's part of the package.
You're not just choosing a POS system. You're choosing a local partner that understands your business, stands by your side, and grows with you. MoneyCache—built for businesses, supported by real people.
🌟 You're Now Ready to Transform Your Business!
You've mastered all 11 steps. Start using MoneyCache POS with confidence!
Copyright © 2022. Powered by Logicbase.